Sooma’s professional email service provides administration tools that allow manual provisioning of accounts as well as day-to-day operations management. However, in scenarios where provisioning of user accounts is centralized in an Active Directory service, it can be useful to automate provisioning. This allows you to:
- Automatically create email accounts in your email domain when a user is created in Active Directory
- Deactivate and delete email accounts when a user is removed
- Synchronize passwords between Active Directory and the email service, effectively unifying access credentials.
Modus operandi
Synchronization is done by an executable, which regularly performs the following operations:
- Extracts from Active Directory the users belonging to the Sooma_5GB and Sooma_50GB groups. Respectively, users with 5GB and 50GB accounts.
- Extracts, from the target users, their email addresses, present in the proxyAddresses field of the Active Directory object
- Compares this list with the one recorded in the Sooma provisioning
- Changes the Sooma provisioning to reflect the state observed in Active Directory
Prerequisites
Before installing the synchronization software, Sooma AD Sync, you must ensure that the Active Directory has the necessary structure, and the creation of credentials in the two synchronization points (AD and mail.sooma.com):
- Ensure that there are two groups, with names “Sooma_5GB” and “Sooma_50GB”
- Ensure that users who must have email are part of the relevant group.
- Ensure that users who should have email have the proxyAddresses field filled in. The value of the field must be the string “SMTP:” followed by the email address. For example “SMTP:john.doe@example.com”
- Create, or allocate for this process, a user in Active Directory with AD replication permissions
- Create, or allocate for this process, a user in https://mail.sooma.com/ with domain administration permissions (or higher)
Installation
Sooma AD Sync can be installed on any server that has access to Active Directory replication ports. For simplicity of permissions configuration, it is easiest to install on any domain controller, which typically are already authorized for replication in an AD forest.
The latest version of the installer is always available at: https://mail.sooma.com/soomaadsync/setup.exe
The installation is trivial: run the installer, and follow the on-screen instructions. It results in the installation of two executables:
- Sooma AD Sync Configurator: Program for configuring and testing synchronization
- Sooma AD Sync: Synchronization program, without graphical interface, to be called by the operating system Task Scheduler
Configuration and Test
Run, with administration permissions, the Sooma AD Sync Configurator, which is present in the Start Menu (right click and choose the option to run as administrator). The following interface appears:

Fill in the configuration fields:
- AD Server Address: Hostname or IP address of the Active Directory server
- ADUsername: AD user with replication permissions, in the format user@domain
- ADPassword: Password of the AD user
- API Key: API Token of the user with domain administration permissions on mail.sooma.com. The API token is available on the user’s administration page at https://mail.sooma.com/profissional
- Email Domain: Email domain under provisioning
Then click Write Config, and click Test. The application will write a list of the provisioning operations it would perform, given the current state of the Active Directory and the Sooma provisioning. It is always safe to click Test; no provisioning operations are performed, a report is simply issued with the plan of operations to perform.
Validate that the operations are correct. In particular, validate that no valid email is going to be deleted because it is not provisioned from the AD. When everything is ok, you can run it by clicking Run, or leave it to be run by the Task Scheduler.
Regular execution
To run regularly, create a Periodic Execution Task in Windows Task Scheduler. Run the Task Scheduler, and follow these steps: 
1. Right-click the Task Scheduler Library folder and create a Sooma folder. Click on Create Task. On the General tab fill the Name field with the name of the task.
 2. In the Triggers tab, click on New, and fill in the fields: Repeat task every with 30 minutes; for a duration of Indefinitely; Stop task if it runs longer than, with 30 minutes. Click OK.
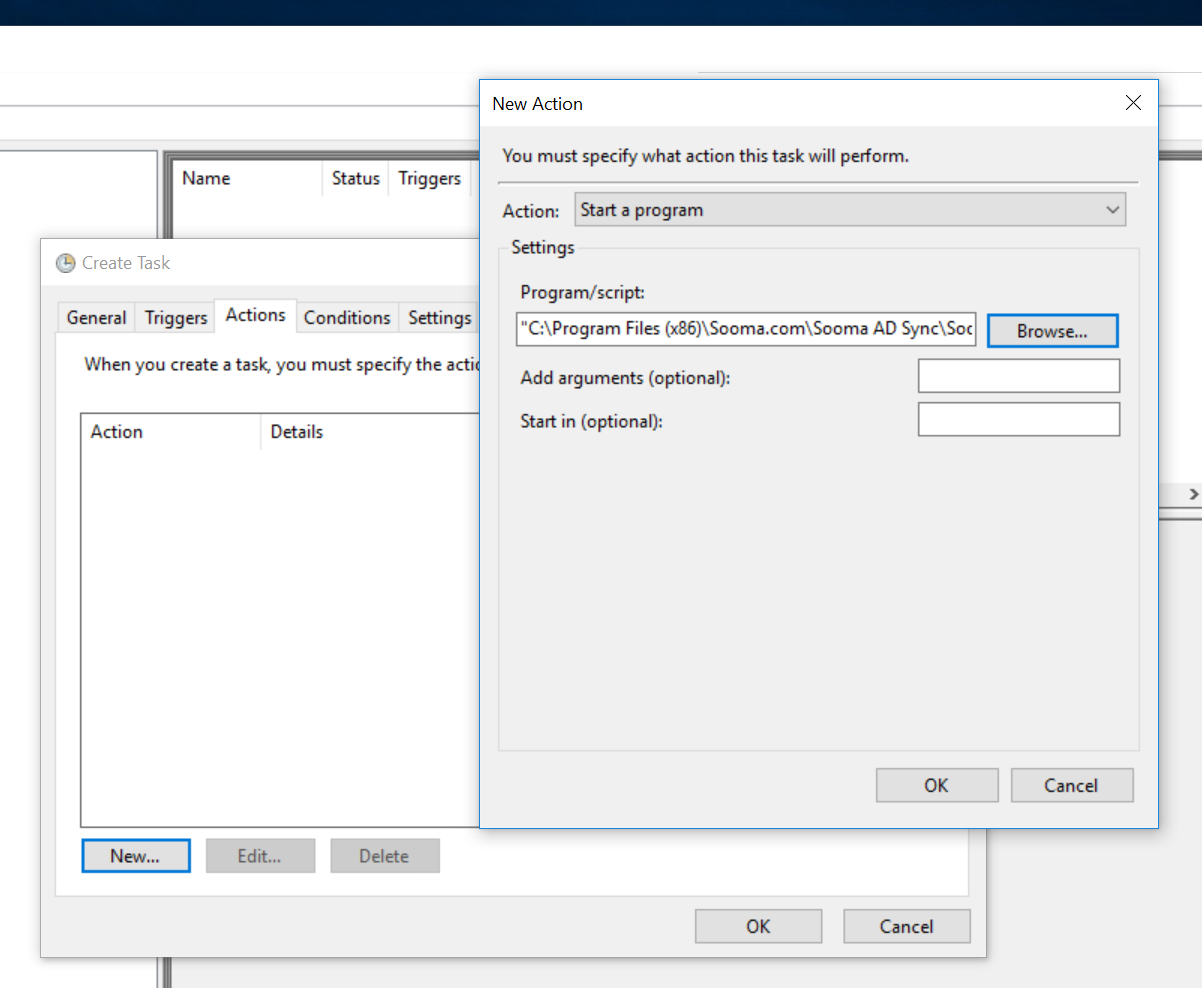
3. On the Actions tab, click New, choose the Start a Program option, and select the executable “Sooma AD Sync.exe” which is in the program folder (typically C:Program Files (x86) ), under Sooma.com Click OK
 4. On the Settings tab, Turn on and fill in Stop the task if it runs longer than 1 hour. Click OK.
Logging
Running the synchronizer is silent, the relevant output is sent to the system log, visible in the Event Log Viewer. The provisioning effects appear naturally in the administration log available on the platform at https://mail.sooma.com/profissional/